
Choose a tool
Begin with Select block or choose a floor, wall, stairs, ramp, or opening tool.

Learn how to build, test, save, and export 3D level layouts with MapChisel.
Start Here
MapChisel is a standalone Windows application for creating and testing 3D level layouts. Build the first version of a space in MapChisel, then continue in Godot or another compatible workflow.
Availability
MapChisel is available for Windows. Visit the Download page for the release that is currently available.
First Launch
The editor opens with a new level and one default layer. Use the toolbar to choose a building tool, use the sidebar to change settings, and create the layout in the 3D viewport.
Begin with Select block or choose a floor, wall, stairs, ramp, or opening tool.
Use the active tool to create the structure of your level.
Select objects to edit their settings, then enter Test Mode when the layout has a floor.
Interface Overview
The editor keeps the building tools, object settings, and 3D view in one focused workspace.
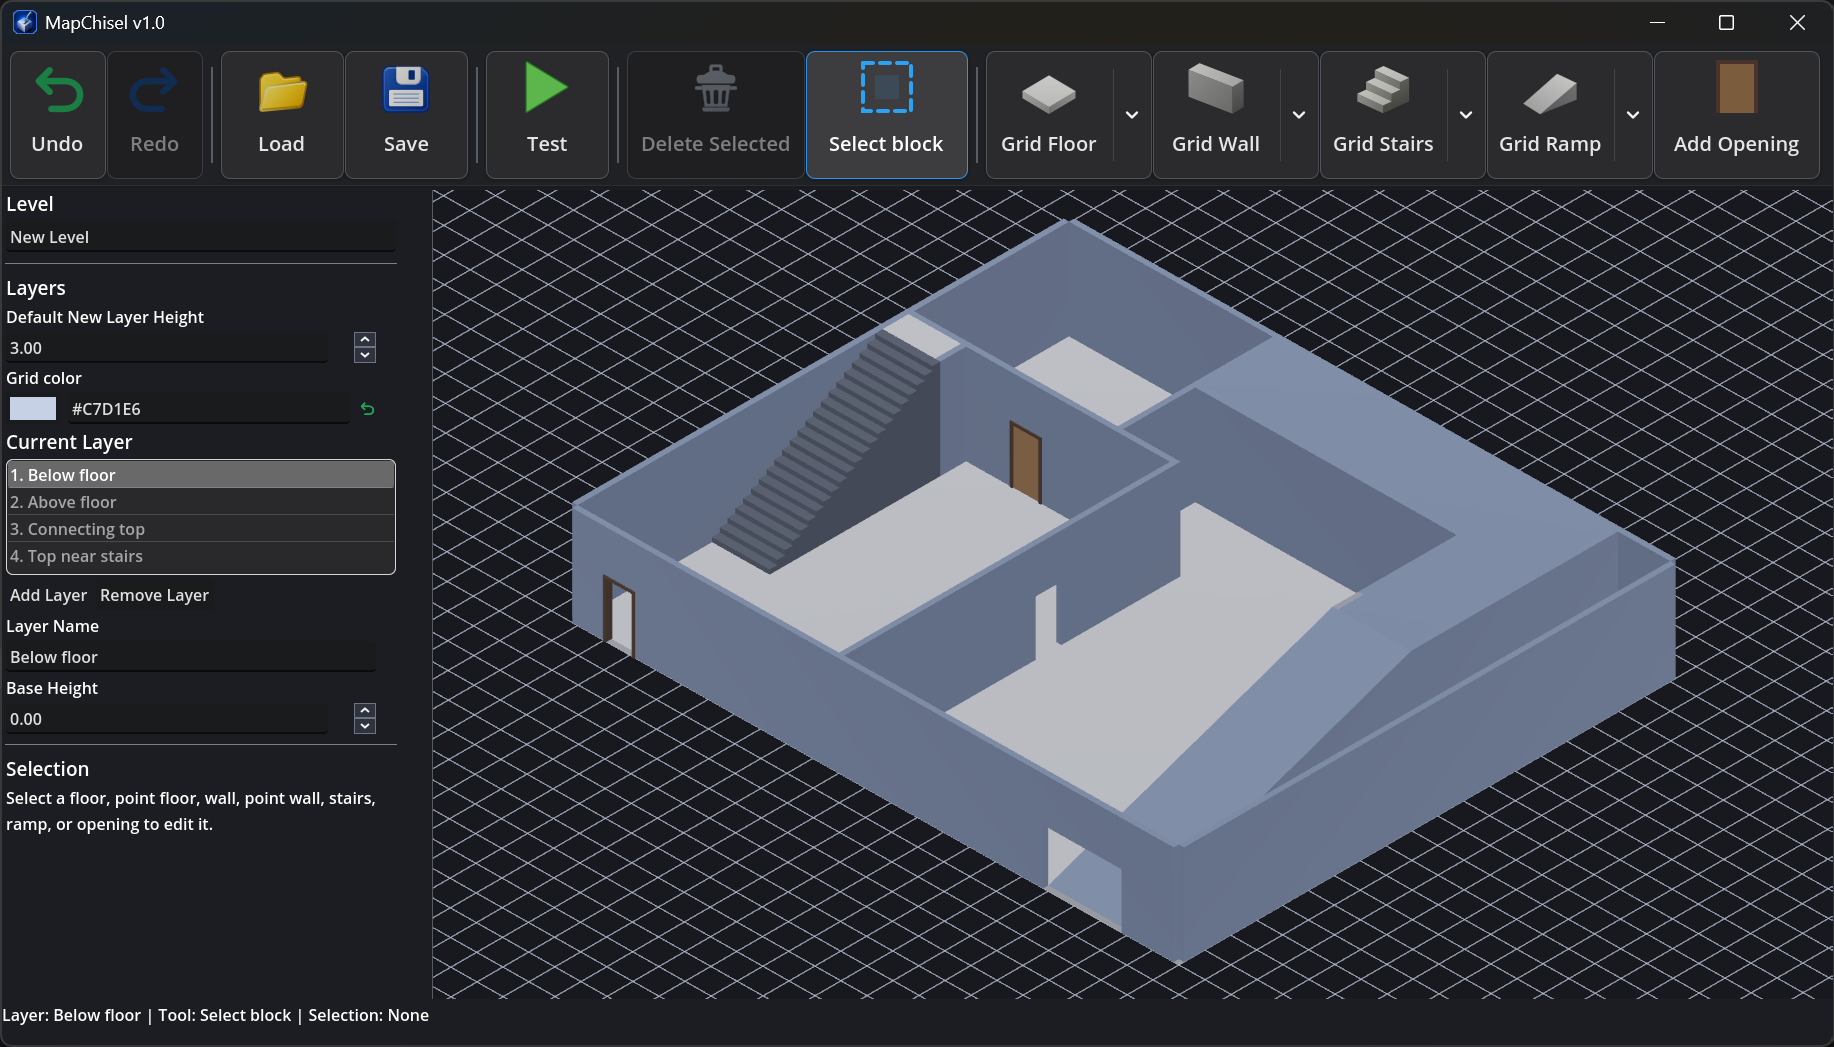
Project actions, Test, selection, building tools, Add Opening, and Full Version access.
Level name, layers, current tool settings, and the inspector for selected objects.
Build the layout, see previews, select objects, and navigate around the level.
Shows the active layer, active tool, selection information, and useful feedback.
Basic Workflow
Build the structure, inspect the space, refine the layout, and export when it is ready.
Create floors for rooms, corridors, and platforms.
Add walls, stairs, ramps, openings, and optional doors.
Select objects, adjust visible settings, and organize the level with layers.
Enter Test Mode to inspect the space from a first-person view.
Save the editable project or export the finished layout with the Full Version.
Return to the editor, refine the layout, and test it again whenever needed.
Core Tools
Use focused tools to create the shape, routes, height changes, and connections of your level.
Create rooms, corridors, platforms, and the main shape of the layout.
Define spaces, boundaries, routes, and supported doorway locations.
Connect different heights with clear stepped paths.
Add smooth height changes and sloped routes.
Create entrances, exits, and optional linked doors between spaces.
Keep larger layouts clear and organized as the level grows.
Floor Tools
Use floors to define the rooms, corridors, and platforms that form the base of the level.
Choose Grid Floor, then left-drag across the grid to create an axis-aligned floor area.
Choose Point Floor, place three or four unique points, then press Enter to confirm the shape.
Tile size, thickness, and color control new floors. After selection, you can adjust position, size, color, and height offset.
Use Backspace to remove the last point. Use Escape to cancel the current points. Very small point-floor areas are rejected.
Wall Tools
Walls shape the space and provide the surface used by openings and linked doors.
Left-drag near a grid edge to create modular wall segments.
Drag two opposite corners to create the outer wall perimeter.
Choose two endpoints to create one straight wall at an arbitrary angle.
Set segment length, wall height, thickness, and color. Selected walls also expose position, orientation or endpoints, and height offset.
Deleting a wall also removes openings attached to that wall and their linked doors. Point walls with endpoints too close together are rejected.
Stairs
Use stairs when the level needs a clear stepped route between two heights.
Choose Grid Stairs or Free Stairs. Hover to preview, left-drag to set the width, then release to create. Middle-drag rotates the active preview.
Grid Stairs use right-angle directions. Free Stairs allow an arbitrary direction.
Set rotation, width, total height, preferred step height, preferred step depth, optional filled base, color, and height offset.
The sidebar shows the calculated step information so you can check the result before creating or editing the stairs.
Ramps
Ramps create sloped routes between heights. Their preview and width controls work like stairs.
Choose Grid Ramp for right-angle directions or Free Ramp for an arbitrary direction. Left-drag sets width and middle-drag rotates the preview.
Choose Walk, Slide, or Custom. The preset controls the visible slope options and the ramp behavior used in Test Mode.
Walk ramps are designed for normal movement. Slide ramps push the player downhill in Test Mode.
Adjust width, height, length, slope, rotation, color, and height offset.
Openings & Doors
Use Add Opening while hovering a supported wall. The preview becomes placeable only when a wall can accept the opening.
Choose a custom opening height or extend it to the top of the wall. Add an optional frame and adjust the opening width, height, colors, and frame settings.
Enable Has Door to add a door to the opening. Selecting the doorway normally lets you edit the opening and linked door together.
Linked doors open vertically when the player approaches and close after the player leaves.
Deleting an opening removes its linked door. Deleting its supporting wall removes the attached opening and linked door.
Selection & Editing
Select an object to open its inspector in the sidebar. The available fields depend on the selected object.
| Action | Result |
|---|---|
| Left click in Select block | Select one object. |
| Ctrl + left click | Toggle objects in a multi-selection. |
| Space | Quickly select the object under the pointer. |
| Ctrl + Space | Toggle quick multi-selection. |
| Click empty space | Clear the current selection. |
| Delete or Delete Selected | Remove the selected object or objects without a confirmation dialog. |
Layers
Layers organize objects at different base heights. The active layer controls where new content is created.
Use the layer controls or the viewport layer menu to add and activate layers. Selecting a layer clears the current object selection.
Give a layer a useful name and adjust its base height when the layout needs another level.
Move one supported selected object into a new lower layer. Attached openings and doors move with a wall.
At least one layer must remain. Removing a layer removes the content in that layer without a second confirmation.
Camera & Controls
Use the mouse directly in the viewport to inspect the layout from different angles.
| Input | Action |
|---|---|
| Middle mouse drag | Orbit the editor camera. |
| Right mouse drag | Pan the view. |
| Right click without dragging | Open the layer menu. |
| Mouse wheel up | Zoom in. |
| Mouse wheel down | Zoom out. |
| Middle mouse drag during stairs or ramp preview | Rotate the active preview. |
Test Mode
Test Mode creates a temporary first-person preview of the current level. Add at least one floor before entering Test Mode.
Move through the level from a first-person view.
Hold Shift while moving to sprint.
Move the mouse to look. Click to recapture the mouse when needed.
Press Escape to leave Test Mode and return to the layout.
Saving & Exporting
Saving and exporting require the Full Version. Choose a normal writable folder for your project or export files.
Save the editable MapChisel project. Load this format later to continue editing the level.
Export generated level geometry and collision for continued development in Godot. Doors remain static.
Export a ready-to-run inspection scene with player movement, environment, and automatic door behavior.
Export structured level information for custom tools and workflows. This format is export only.
Export visible level geometry and color materials for compatible 3D tools and engines.
Full Version
Use the Full Version panel when you have received a license file for your computer.
Open Full Version.
Copy the displayed Computer Code.
Choose Load License File and select the license supplied for that computer.
Confirm that the Full Version is unlocked before saving or exporting.
Troubleshooting
| Problem | What to do |
|---|---|
| An opening cannot be placed. | Hover a supported wall before clicking. |
| A point wall is rejected. | Move the two endpoints farther apart. |
| A point floor is rejected. | Use three or four distinct points and create a larger area. |
| Test Mode is unavailable. | Add at least one floor to the level. |
| A layer cannot be removed. | Keep at least one layer in the level. |
| A project cannot be loaded. | Choose a valid editable MapChisel project file. |
| Saving or exporting fails. | Choose a normal writable folder and confirm that the destination is available. |
| A door does not react in Test Mode. | Confirm that the opening has a linked door and that the player can approach it. |